


Do It Yourself
This page groups some of my personal projects related to astronomy.
- RTI-Zone Observatory dome controller
- Dome "simulator" for X2 plugin development
- Arduino shield for the NexDome Rotation Kit
- 3D printed bracket for Feather Touch focuser with RoboFocus
- Focuser controller
- Robofocus install on Meade 102ED APO
Dome "simulator" for X2 plugin development
When I started writing X2 plugin for TheSkyX Pro Dome Add-on I needed a way to test them. As I started with the NexDome one, I build this "simulator" with almost the same component as the original Rotation Kit from NexDome.
The other side had a Maxdome II controller (it has been returned to its owner) and a DZRALTE-020L080 servo drive controller from Advanced Motion Controls.I made my own sensor with an OPB608V and printed a black/white pattern to create the ticks for the MaxDome II controller. There is also a US digital 1024 CPR quadrature encoder for the DZRALTE-020L080 motor position feedback.
Here are some photo of the development platform :


Arduino shield for the NexDome Rotation Kit
Some people who ordered the NexDome Rotation Kit had some issues to say the least (from non working unit to partially working). So I decided to help these people as I built my own test bed (above) to write the X2 plugin for TheSkyX Pro. I made a new Arduino shield which allow the user to get rid of the rat's nest that is inside the original Rotation Kit (see picture bellow). A good example of the issue(s) is readable in this thread on Cloudy Nights forum : Nexdome...should have gone with something else and My NexDome rotates!. These are examples among others
The shield was designed based on the first enclosure NexDome was using (picture on the left). As seen bellow they have a new enclosure (picture on the right), so you might need to drill a new hole to connect the usb cable on these.
Before:
Click on the thumbnails to see the full size picture.


After:
Click on the thumbnails to see the full size picture.


Here is a connection diagram :
Click on the thumbnails to see the full size picture.
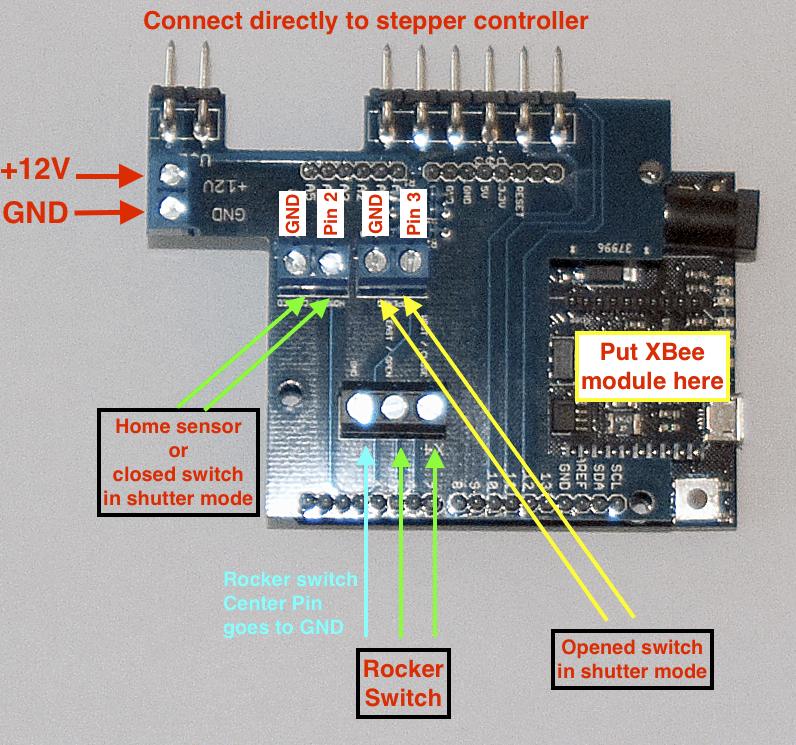
Here is a link to the Eagle CAD files if you want to make your own shield : NexDomeShield.zip.
I got my PCB made by dirtypcbs.com. If you need only one, you might want to group the order with other people and get a pack of 10, which bring the PCB price to about $3 (including shipping). You can also contact me in case I have some left over. The shield can be used for the Rotation Kit but also for the Shutter as I put the extra wiring on it (see diagram above).
The dip switches on the stepper conntroller should be set to 8 micro steps and 2.5 Amps :
- 1 - 2 - 3 : Off - On - Off => 8 micro steps
- 4 - 5 - 6 : Off - On - On => 2.5 Amps
And the list of components (total cost is less than $9 before taxes and shipping) :
- 1 x STL140/2 Right Angle
- 1 x STL140/6 Right Angle
- 1 x 2.54MM BREAKAWAY Vertical 32 CKT Tin
- 1 x Fixed Terminal Blocks AK500/3wp
- 3 x Fixed Terminal Blocks AK500/2wp
- 3 x Metal Film Resistors - Through Hole 100K Ohm 1/4W 1%
If you're building your own from scratch :
- Arduino Leonardo : DFRobot Leonardo with Xbee Socket
- Stepper controller : TB6600 4A 9-42V Stepper Motor Driver
- XBee radio : Digi XBee 1mW Wire Antenna - Series 1 (802.15.4)
- Stepper motor : 57STH56 NEMA-23 Bipolar Stepper with 15:1 Gearbox
3D printed bracket for Feather Touch focuser with RoboFocus.
When I got my AT12RC telescope I bought the Feather Touch 3" focuser for it (model FTF3015B-A). I also got a RoboFocus for it. After countless emails with Technical Innovations I sent them the focuser so that they can do a proper install of the motor. Why? Because the new Feather Touch focuser now has a round pinion block as opposed as the flat one they were using before. So the standard RoboFocus bracket was not compatible.
The focuser came back with the motor installed but it was not satisfactory. When the motor was turning, the torque was making the bracket also turn/warp. Also Technical Innovations didn't tighten the tension screw very much which was adding a lot of backlash to the already unstable install. I somewhat solved this by adding 2 square pieces of plastic between the pinion block attaching screw and the focuser bracket, and tightening the load screw more. This seriously reduced the backlash and the movement in the bracket when the motor was turning. But I still wasn't satisfied. So I decided to build a bracket that would attach to the RoboFocus bracket at the bottom, and to the focuser at the top by using the 2 finder scope bracket holes. After 2 prototypes and some adjustments to the hole positioning (both top and bottom) and some length adjustment, I had a very stiff solution. I was able to get from a backlash of 45 steps to ... 3 steps! I did 2 of these because I also replaced the focuser on my Meade 102ED with a 3" Feather Touch focuser (model FTF3035B-A with the A30-1903-ES102 adapter).
Here are some pictures, as well as the STL file if you need to do the same thing :
Click on the picture for a bigger view.


STL file for the bracket : Bracket_fixed.stl
Focuser controller
When I bought a JMI focuser for my Meade SN8, I also bought the MOTOFOCUS unit with DRO Encoders for it, as well as the DRO Hand Unit. That worked well enough for visual observing, but for imaging with a camera there was no good way of focusing. I needed a way to control the focuser from the imaging application.
JMI sells the Smart Focus interface... for $399! I decided to build my own one as I knew enough about PWM, micro-controllers and C coding on embedded systems. After some research I decided to go with the Atmel ATMega32U4 as it has native USB support. I then bought a Teensy 2.0 board for the prototyping. I use it with the LUFA library.
I use the CDC device class so that there is no need for a custom driver on the OS. This works great on macOS and should also work well on Windows and Linux. After a few months of coding and testing I got a working prototype. It implements all of the Smart Focus commands so that I can use my controller with existing software (Equinox Image and Equinox Pro on macOS in my case).
The next step is to add support to control a second focuser using stepper motor. I'll implement the Robofocus commands. The controller will show up as 2 independent serial ports on the machine. It will support bipolar motors first, and then I'll design a small PCB that can be plugged on the main board in place of the SN754410 to control unipolar motors using an ULN2068B (like the original Robofocus).
Click on the picture for a bigger view.
1st prototype (single focuser):


2nd prototype (dual focuser) :


If you're interested in the focuser controller contact me : 
Install a Robofocus motor on a Meade series 5000 102mm f/7.0 triplet ED APO.
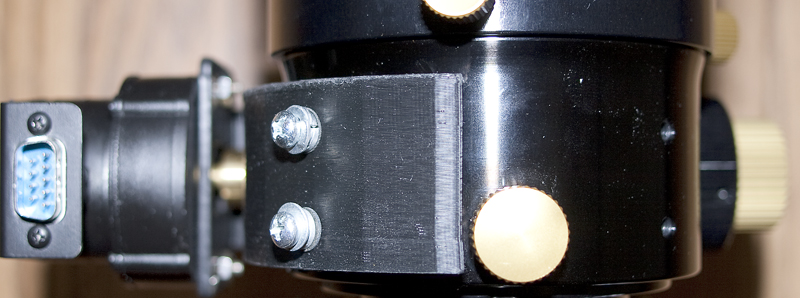
To be able to use Equinox Image to autofocus the telescope I needed to motorize the focuser. I was able to find a robofocus motor for sale, I then needed to find a way to attach it to the telescope. I chose to use 2 HTD3 timing pulleys and an HTD3 timing belt.
I built the bracket using some 19" equipment racking brackets, some drilling, tapping and bolts. The result works fairly well in Equinox Image. I set the out backlash to 10 and tensed the belt as much as I could. I noticed that the focuser axle was bending, so I added 4 small ball bearings and 2 washers to prevent this from happening. The results are good, and the single frame of M27 I did was well focused.
Click on the picture for a bigger view.

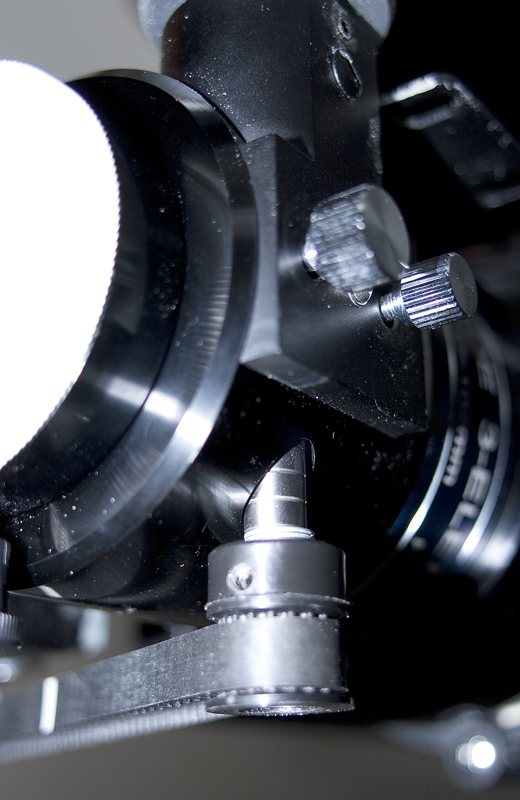

I have since replaced this with a 3" Feather Touch focuser and Robofocus with a 3D printed extra bracket as I wasn't happy with the RoboFocus bracket installation (the Feather Touch focuser has the new round pinion block).
All pictures and/or material on this page is the property of Rodolphe Pineau. Unauthorized use and/or duplication of this material without express and written permission from the author and/or owner is strictly prohibited.